Ombre Nails: 2025 Trends, Techniques & Stunning Designs
Struggling with boring, flat nail colors that lack visual interest and dimension? You’re not alone millions of nail enthusiasts feel trapped by limited design options that don’t capture their creative vision.
The frustration builds when you see gorgeous ombre nails on social media but can’t achieve that seamless, professional gradient effect at home. Without proper technique, your attempts result in harsh lines, patchy coverage, or muddy color blends that look nothing like the stunning nail art you admired.
The solution lies in mastering ombre nail techniques that transform ordinary manicures into captivating works of art. Ombre nails offer the perfect blend of sophistication and creativity, allowing you to create smooth color transitions that catch light beautifully and complement any style.
Whether you prefer subtle neutral gradients or bold rainbow ombre designs, this comprehensive guide reveals professional secrets for achieving flawless ombre nail art that rivals salon results.
What Makes Ombre Nails the Perfect Choice for Modern Nail Art?
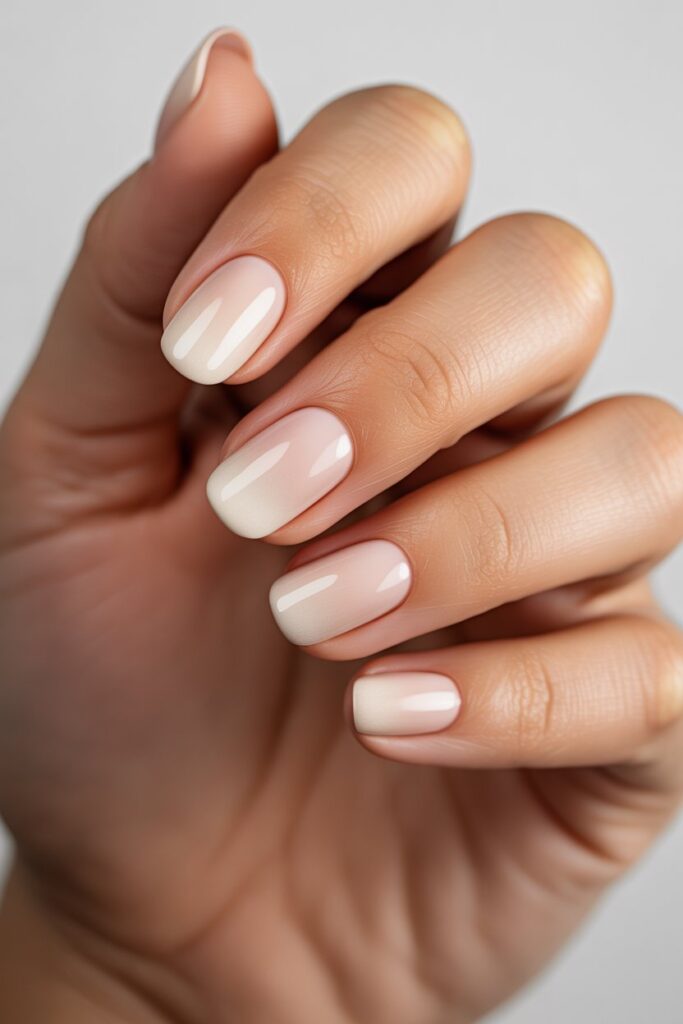
Ombre nails represent the pinnacle of contemporary nail design, combining technical skill with artistic flair to create mesmerizing gradient effects. The French word “ombre,” meaning shadow, perfectly captures the essence of this technique colors blend seamlessly from light to dark or transition between complementary shades with ethereal beauty.
The versatility of ombre nail designs makes them suitable for every occasion and personal style. Professional settings benefit from subtle nude ombre combinations, while special events call for dramatic metallic gradients or jewel-tone blends. The gradient nail art technique allows for endless customization, making each manicure uniquely yours.
What sets ombre nails apart from traditional solid colors is their dimensional quality. Light interacts differently across the gradient surface, creating visual depth that makes nails appear longer and more elegant. This optical illusion explains why ombre nail art has become a favorite among celebrities and beauty influencers worldwide.
The color transition in ombre nails also provides practical benefits beyond aesthetics. Gradient designs help camouflage nail imperfections, uneven lengths, or minor chips better than solid colors. The blended effect creates a forgiving finish that maintains its beauty longer than stark, single-tone applications.
How Do You Choose the Right Color Combinations for Stunning Ombre Effects?
Selecting perfect ombre nail colors requires understanding color theory and current nail trends. This year’s trends feature ethereal chrome fades, where metallic shades melt seamlessly, and eco-chic gradients using earthy tones like moss green and terracotta, offering sophisticated options for every preference.
Complementary color combinations create the most striking gradient effects. Classic pairings include pink-to-white for romantic looks, blue-to-purple for dramatic statements, or neutral beige-to-brown for professional settings. Analogous colors (neighboring hues on the color wheel) produce more subtle transitions perfect for everyday wear.
Temperature considerations play a crucial role in ombre nail color selection. Warm-toned combinations featuring coral, peach, and gold work beautifully for spring and summer, while cool blues, purples, and silvers complement fall and winter wardrobes. Monochromatic gradients using varying shades of the same color family offer sophisticated elegance.
For a bold statement, try neon ombre with electric pink, purple, and blue transitions, or keep it luxe with jewel-toned blends. These vibrant ombre combinations make powerful fashion statements while showcasing advanced nail art skills.
Consider your skin tone when selecting ombre colors. Cool undertones pair beautifully with silver-based gradients, jewel tones, and blue-purple combinations. Warm undertones complement gold-based ombre, coral-pink blends, and earth-tone gradients. Neutral undertones offer the most flexibility, working well with virtually any color combination.
Read More About : Silver Christmas Nails: 50+ Dazzling Holiday Nail Designs for 2025
Which Techniques Create the Most Professional-Looking Ombre Nail Results?
Sponge technique remains the gold standard for creating flawless ombre nail art. This method involves applying base colors to a makeup sponge, then gently dabbing the nail surface to achieve smooth color blending. The porous sponge texture naturally creates the gradient effect while maintaining color vibrancy.
Brush blending offers more precise control over gradient placement and color intensity. Using specialized ombre brushes or clean nail art brushes, you can manually blend wet polish colors for seamless transitions. This technique works particularly well with gel polish systems that provide extended working time.
The original technique for ombre nails involves using a makeup wedge or brush to apply the powder to only half of the nail. Our Air Ombre is a dip powder that is sprayed, a completely different approach to the ombre technique, demonstrating how ombre techniques continue evolving with new nail technologies.
Dip powder ombre has revolutionized professional nail salons by offering superior durability and color saturation. Dip powder is an improved method because the fine powder allows for more precise gradient control and longer-lasting results than traditional polish methods.
Airbrush ombre represents the cutting edge of professional nail art techniques. This method uses compressed air to spray fine color mists, creating incredibly smooth gradients impossible to achieve with manual methods. While requiring specialized equipment, airbrush techniques produce the most seamless ombre effects.
Layer building creates depth and richness in ombre designs. By applying multiple thin coats of gradient colors, you can achieve complex color transitions with professional polish. Each layer adds dimensional quality while maintaining the smooth finish essential for high-quality ombre nails.
What Are the Most Popular Ombre Nail Trends Dominating 2025?
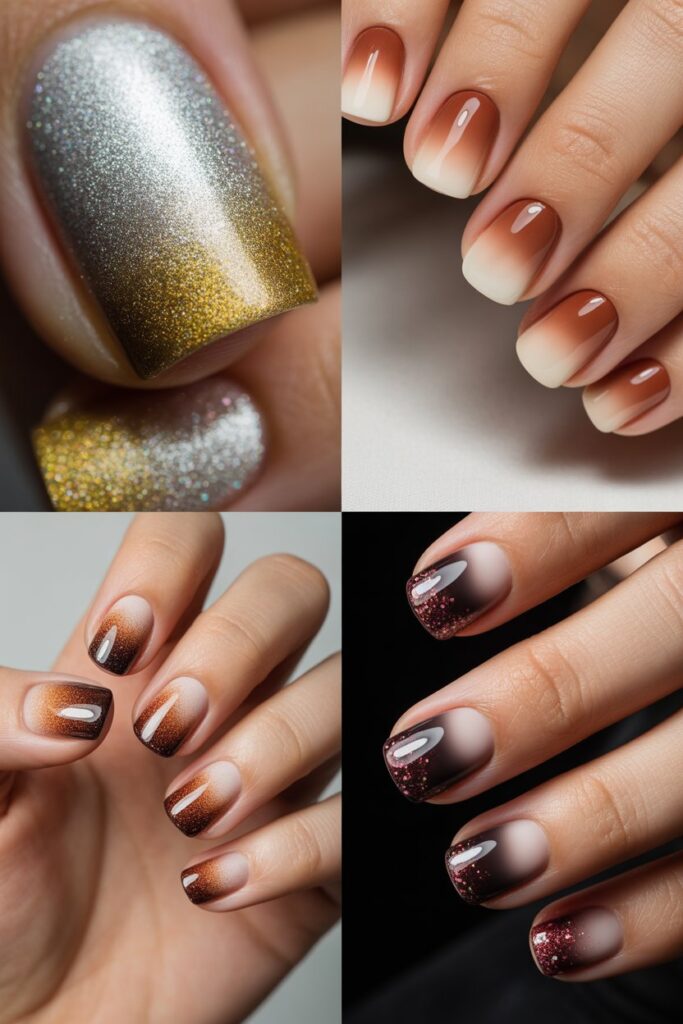
One of the hottest trends for 2025, orange ombre nails are bold and vibrant. Pair them with a glossy finish for maximum impact ideal for summer or tropical getaways. These vibrant orange gradients represent the year’s emphasis on cheerful, optimistic colors.
Using a nature-inspired palette of brown, grey and cream polishes, ombre nails that mirror the changing of the seasons feel apt for this time of year. Earth-tone ombre designs connect wearers with natural beauty while offering sophisticated neutrals for professional settings.
Chrome ombre nails dominate luxury nail trends, featuring metallic gradients that shift from silver to gold or copper to rose gold. These reflective finishes catch light dramatically, creating stunning visual effects that complement both casual and formal attire. Chrome powder application over gel bases produces the most intense metallic shine.
Glitter ombre designs add sparkle and glamour to traditional gradient techniques. By concentrating glitter density at nail tips and fading toward the cuticle, you create dynamic textural gradients perfect for special occasions. Fine glitter particles blend more smoothly than chunky alternatives.
Negative space ombre incorporates clear areas within gradient designs, creating modern, minimalist aesthetics. These contemporary nail art approaches appeal to fashion-forward individuals seeking unique alternatives to traditional solid ombre applications.
French ombre manicures modernize classic French tips by replacing stark white lines with subtle gradients. for example you could create a horizontal gradient instead of the typical vertical blend, or even incorporate it into a French manicure for a modern twist. This evolution maintains French elegance while adding contemporary flair.
How Can You Master Ombre Nails Using Dip Powder at Home?
Dip powder ombre offers superior durability and professional results achievable in home settings. This process involves coloring your nails with high-pigmented powder. After a few layers and some sealer, they are complete, making it accessible for DIY enthusiasts.
Start with proper nail preparation by pushing back cuticles, filing nails to desired shape, and applying dehydrating primer. Clean nail beds ensure optimal dip powder adhesion and prevent lifting that compromises ombre effects. Base coat application creates the foundation for smooth color transitions.
Color layering requires strategic application for seamless gradients. Apply your lightest dip powder color to the entire nail, then use an ombre brush to apply darker shades progressively toward nail tips. Take an ombré brush and dip it into your second shade of choice. You want to carefully scrub the color onto the tip of your nail, ensuring smooth blending.
Powder removal between coats maintains clean gradient lines. Gently brush away excess powder before applying activating solution to harden each layer. This step prevents muddy color mixing that ruins ombre effects.
Sealing techniques preserve ombre beauty and extend wear time. Apply top coat evenly across gradient surfaces, ensuring complete coverage without disturbing underlying color blends. UV curing or air drying according to product specifications locks in professional results.
Professional tips enhance home dip powder ombre success. Work in thin layers for better color control, use high-quality brushes for smooth blending, and maintain consistent powder ratios across all nails for uniform gradient effects.
Read More : December Nails: 80+ Stunning Winter & Holiday Designs for 2025
Why Do Gel Polish Ombre Techniques Produce Salon-Quality Results?
Gel polish ombre offers extended working time that allows for perfect color blending before curing. Unlike traditional polish that dries quickly, gel formulas remain workable for several minutes, enabling precise gradient manipulation and seamless color transitions.
LED curing locks in gel ombre designs with incredible durability and chip resistance. The polymerization process creates hard, glossy finishes that maintain their beauty for weeks without fading or peeling. This longevity makes gel ombre ideal for busy lifestyles.
Color saturation in gel polish ombre surpasses traditional formulas due to highly pigmented gel bases. Multiple thin coats build rich, vibrant gradients without the streaking or opacity issues common in regular polish applications. Professional gel systems offer the widest color ranges for creative ombre combinations.
Layering control allows for complex gradient effects impossible with quick-drying polishes. Each gel layer can be manipulated independently before curing, enabling sophisticated multi-color transitions and dimensional ombre designs that showcase advanced nail art skills.
Finish options multiply with gel ombre techniques. Matte top coats create sophisticated textural contrasts, while glossy finishes maximize color vibrancy. Textured gels add dimensional elements that enhance gradient visual interest.
Professional application techniques using gel systems include wet blending methods where colors are mixed directly on nail surfaces before curing. This approach produces the smoothest gradient transitions possible, rivaling salon results when executed properly.
What Creative Ombre Nail Art Designs Are Trending This Season?
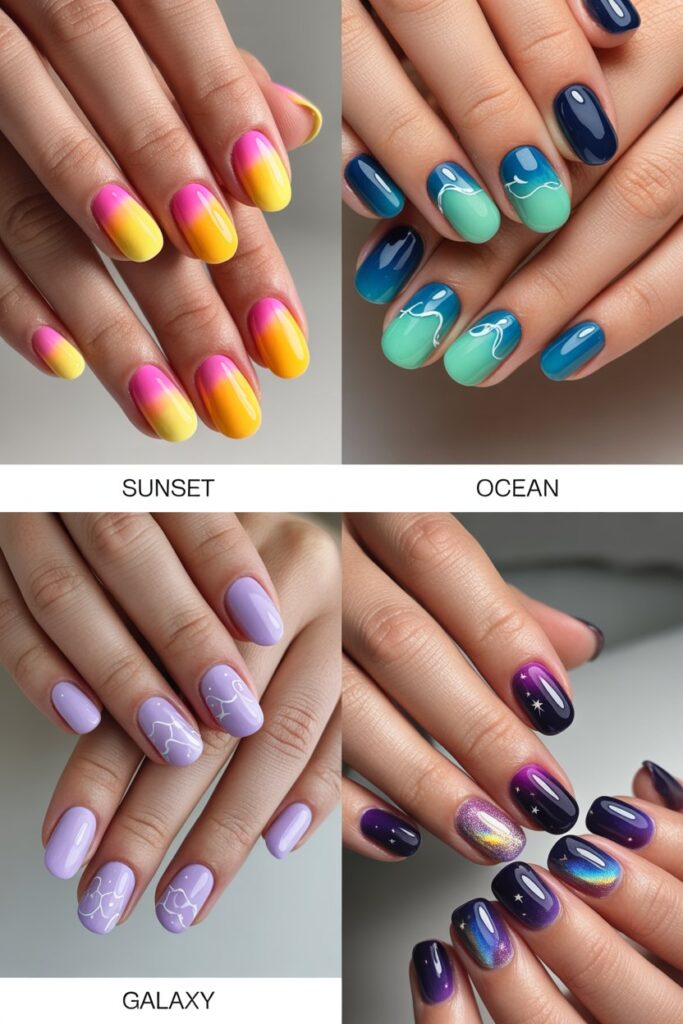
Sunset ombre nails capture natural beauty with warm color progressions from yellow through orange to deep red or purple. These romantic gradients evoke peaceful evenings and work beautifully for both casual wear and special occasions. Coral accents and gold highlights enhance the sunset effect.
Ocean-inspired ombre designs blend blues, greens, and whites to mimic waves and seascapes. Turquoise to navy gradients create calming effects perfect for summer, while teal and silver combinations offer sophisticated alternatives for professional settings.
Galaxy ombre nails incorporate dark base colors with metallic highlights and glitter accents to recreate starry night skies. Purple to black gradients serve as backgrounds for silver star details or holographic top coats that shift colors like distant galaxies.
Floral ombre backgrounds provide perfect canvases for delicate nail art. Pastel gradients from pink to white or lavender to cream create soft foundations for hand-painted flowers or floral decals. These feminine designs suit spring weddings and garden parties.
Geometric ombre combinations merge gradient backgrounds with angular patterns for modern, artistic effects. Color blocking techniques create sections within ombre designs, while negative space triangles add contemporary flair to traditional gradient applications.
Holiday-themed ombre adapts gradient techniques for seasonal celebrations. Red to green Christmas ombre, orange to black Halloween gradients, and pastels for Easter demonstrate how color selection transforms basic techniques into festive nail art.
How Do You Fix Common Ombre Nail Mistakes and Imperfections?
Harsh gradient lines represent the most frequent ombre nail challenge, typically caused by insufficient blending or incompatible color combinations. Fix harsh transitions by applying blending medium or clear polish over problem areas, then gently dabbing with a clean sponge to soften edges.
Patchy coverage occurs when application pressure varies across nail surfaces or when colors aren’t properly layered. Address patches by adding thin coats of problem colors to affected areas, then re-blending with appropriate tools before the polish sets completely.
Muddy color mixing results from over-blending or using incompatible color temperatures. Prevention involves selecting harmonious color combinations and limiting blending motions to preserve color integrity. Once muddy mixing occurs, complete removal and reapplication usually provides the best solution.
Bubble formation in ombre applications stems from aggressive sponging or thick polish consistency. Prevent bubbles by using gentle dabbing motions and thinning thick polishes with appropriate thinners. Existing bubbles can be popped with sterilized needles before applying top coats.
Uneven gradient distribution across multiple nails creates unprofessional appearances. Maintain consistency by measuring color placement and using identical blending motions for each nail. Practice templates help achieve uniform gradient proportions across entire manicures.
Streaking issues in brush-applied ombre require technique adjustments and proper brush maintenance. Clean brushes between colors, use light pressure, and work quickly while polish remains workable. High-quality brushes with appropriate bristle densities prevent streaking problems.
Read More : Christmas Chrome Nails: 50+ Irresistible Mirror-Finish Holiday Designs for 2025”
What Professional Tools and Products Create the Best Ombre Effects?
Makeup sponges remain essential for classic ombre techniques, with fine-pore cosmetic wedges producing the smoothest gradient transitions. Latex-free options prevent allergic reactions while maintaining proper polish absorption for consistent results.
Ombre brushes specifically designed for nail art offer superior color blending control compared to improvised alternatives. Flat, dense brushes work best for dip powder applications, while soft, rounded brushes excel at gel polish blending. Synthetic bristles maintain their shape longer than natural alternatives.
Professional polish thinners maintain proper consistency for smooth ombre applications. Quality thinners restore thick polishes without compromising color intensity or wear characteristics. Avoid using acetone or rubbing alcohol, which damage polish formulations.
LED curing lamps ensure proper gel polymerization for durable ombre results. 36-watt minimum output provides adequate curing power, while timer functions prevent over-exposure. Professional-grade lamps offer consistent light distribution across all nail positions.
Color mixing palettes allow for custom gradient shades and precise color control. Glass palettes clean easily and don’t absorb polish colors, while disposable paper palettes offer convenience for single-use applications.
Top coat varieties enhance and protect ombre designs with different finish options. Fast-dry top coats speed application processes, gel top coats provide maximum durability, and matte finishes create sophisticated textural contrasts in gradient designs.
Which Nail Shapes Work Best with Different Ombre Techniques?
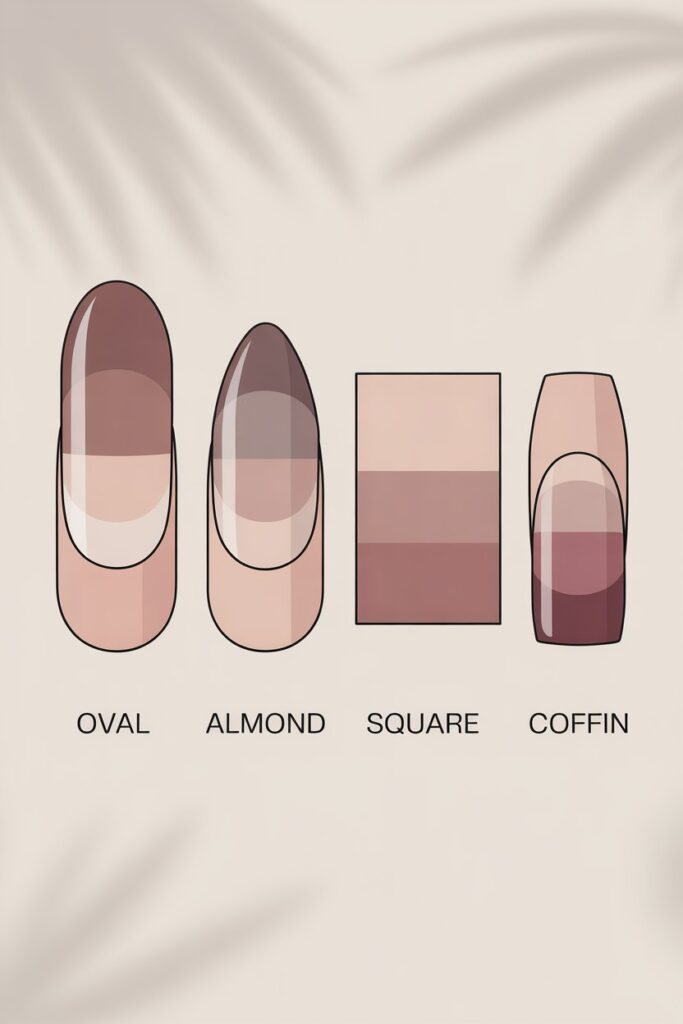
Oval nail shapes provide ideal canvases for vertical ombre gradients, allowing color transitions to flow naturally from cuticle to tip. The curved sides complement soft gradient blends and create elegant, feminine appearances perfect for pastel ombre combinations.
Almond-shaped nails elongate fingers while showcasing dramatic ombre effects. The tapered points concentrate attention on nail tips, making them perfect for dark-to-light gradients or metallic ombre accents. Bold color combinations work particularly well with almond shapes.
Square nails suit horizontal ombre techniques and geometric gradient designs. The straight edges provide clean lines for color blocking within ombre applications, while the wider nail beds accommodate complex multi-color transitions and detailed nail art.
Coffin or ballerina shapes offer maximum surface area for elaborate ombre designs and gradient nail art. The flat tips create perfect spaces for concentrated color applications, while the tapered sides enhance vertical gradient effects.
Round nail shapes work beautifully with subtle ombre techniques and natural color combinations. The soft curves complement gentle gradients and create low-maintenance appearances suitable for conservative environments or everyday wear.
Stiletto nails make bold statements with high-contrast ombre designs and dramatic color combinations. The extreme length provides ample space for complex gradients, detailed artwork, and eye-catching effects that showcase advanced nail art skills.
Frequently Asked Questions
How long do ombre nails typically last compared to regular polish?
Ombre nail longevity depends on application method and base formulas. Gel ombre designs last 2-3 weeks with proper care, dip powder ombre extends to 3-4 weeks, while regular polish ombre lasts 5-7 days. Proper base preparation and quality top coats significantly extend wear time.
Can you create ombre effects with any nail polish brands?
Most high-quality nail polish brands work for ombre techniques, though consistency and blending properties vary significantly. Professional gel systems and salon-grade polishes produce the smoothest gradient results, while drugstore brands may require thinning or additional blending for optimal effects.
What’s the easiest ombre technique for absolute beginners?
Sponge ombre using complementary colors offers the most forgiving introduction to gradient techniques. Start with similar color temperatures like pink-to-white or blue-to-purple, use high-quality makeup sponges, and practice light dabbing motions for smooth color transitions.
How do you prevent ombre colors from becoming muddy?
Color selection plays the crucial role in preventing muddy gradients. Choose harmonious combinations, avoid mixing warm and cool tones, and limit blending motions to preserve color integrity. Analogous colors (neighboring on color wheels) blend most smoothly without muddying.
Can ombre techniques work on short natural nails?
Short nails accommodate ombre designs beautifully, though technique modifications optimize results. Horizontal gradients work better than vertical transitions on limited surface area, while subtle color differences create sophisticated effects without overwhelming small nail beds.
Conclusion
Mastering ombre nails transforms your manicure game with sophisticated gradient effects that capture attention and express personal style. From subtle neutral transitions to bold rainbow gradients, these versatile nail art techniques suit every occasion and skill level. The professional application methods outlined in this guide enable salon-quality results at home, while trending color combinations keep your nail designs fashion-forward.
Ombre nail art continues evolving with innovative techniques and products that make stunning gradient effects more accessible than ever. Whether you prefer classic sponge methods, advanced gel applications, or durable dip powder systems, consistent practice with quality materials yields professional results.
Remember that color harmony, proper preparation, and patience during blending create the foundation for flawless ombre manicures that showcase your creativity and technical skill.

